|
Even though this was done during the diesel project, this part of the trucks restoration is still important to
mention. The dash on the LUV was totally fucked up, deep cracks and an uneven leveling all across. An Ebay
vendor happened to have one of those dash caps that you tend to see available for classic car dashes. These caps glue
in place over the old dash, giving the dash a seemingly new fresh appearance again. Only the most discerning observer
would really find such a patch to be unappealing. As far as someone like me who just wants the thing to look decent,
preferring the patched up dash over the cracked up dash, I immediately bought this thing.
After receiving the dash cap, I had to clean the old dash off and cut chunks of the padding off to help level
the dash enough that when I put the dash cap in place, it will fit evenly all the way across the dash. I emptied the
entire contents of the glue tube over the dash cap and pressed the cap onto the dash, then wedged a couple of bags with some
rags and a sheet between the dash and windshield, along with a sweatshirt. All of this at least helped to hold the dash
cap down on the old dash well enough to allow the glue to cure so the following morning when I removed the stuff from the
dash, the cap was still sitting nicely on the old dash, making the overall appearance of the dash look a lot better than what
the old one did.

|
| The new dash cap in place, note difference between new cap and rest of faded dash |
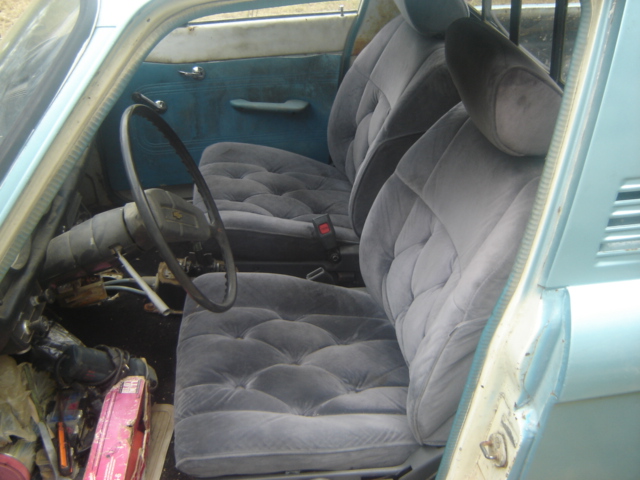
Another thing I did was install two bucket seats we pulled from a Toyota Cressida at the junkyard.
It turned out the seats fit just fine, they weren't too wide or high or deep. In fact, they fit perfectly, and the mounts
look pretty easy enough to modify to fit the floor of the LUV. Another cool perk about these seats, since the Cressida
was a "bells & whistles" model, the driver's seat had controls to adjust the height and in/out position of the seat base,
to fit the driver's ass, plus a seat warmer, also for the driver's ass. It's nice to know that a seat can be made so
lovingly with the driver's ass as a first priority!. Seriously though, with these seats in place, at least driving this
truck will be more comfortable than it would've been with the ratty bench seat that the truck originally came with.
|
| Bucket seats placecd in truck for fitting, looks a lot better now... |
Another thing that I had to do was install new guages since during the diesel project, the stock temperature
guage failed to work right, and the charge and oil pressure indicators (just lights, not even guages), were not really hooked
up to anything to allow them to work. I took the triple gauge cluster that I pulled from the Falcon and installed it
in the LUV.
I had to install a T-tap fitting in the heater hose line so I can put the fitting for the temperature gauge in
place, since instead of the gauge being electrical and going to a sender unit, it uses some kind of probe thats hooked up
to the gauge. I also had to install a special fitting in place of the oil sender unit and route a narrow tube over through
the firewall and to the oil pressure guage since it literally uses the pressure of oil in the tube to register a reading on
the gauge. The alternator wasn't too bad to hook up, with just a tap in the starter circuit, done inside the dash where
the line comes from the starter switch before going through the firewall. The gauge lights were also hooked up,
by just tapping into the circuit for the original gauge lights on the headlight circuit. At this point all the
gauges are ready to rock and roll.
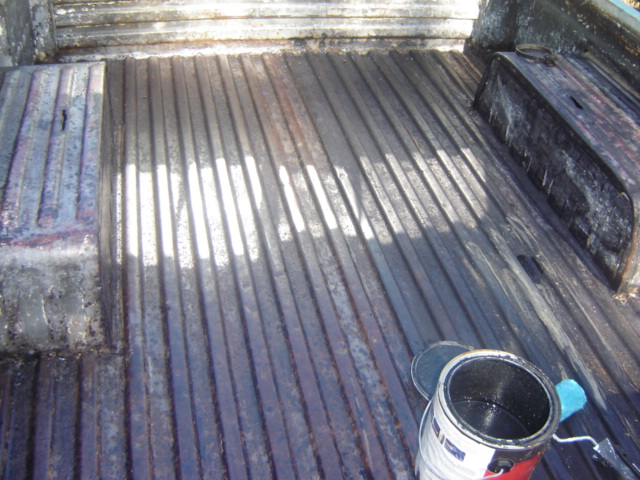
Another thing I did was clean up the bed and paint on a generic bedliner to help protect the bed for a good while.
While its not as good as Line-X or Rhinoliner, hey, this is an old cheap truck, what better way to go with the bed liner than
cheap?
|
| Bed with Hurculiner half applied |
I patched a couple of holes in the cab as well. I cut out a section of the floor behind the passenger
seat to get rid of the rotted out area, and I took a scrap oil drum lid from my scrap pile and cut a rectangular patch out
of it to weld in place. I ground the rust out to expose clean metal so the welding will go cleanly.
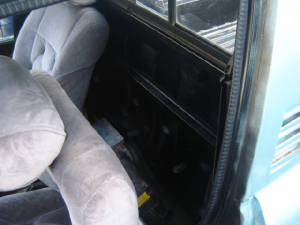
Next on the list is the rest of the interior. For starters, I took some vinyl/fabric spray paint,
in gloss black and spray painted most of the interior. The headliner and door panels along with these vinyl moldings
all got sprayed black. I then took some regular black spray paint and sprayed the white inner walls of the cab, especially
around area behind the seats.
The next thing I did was install some seatbelts that we picked up from the junkyard. These seatbelts came
from another LUV so they would fit directly into our truck with no hassles. The only thing is the belts came from a
light brown interior so they too were light brown. Out came the vinyl paint and they got sprayed completely in order
to match the newly sprayed black interior of our truck. I did have to remove these boards that held a couple of speakers so
I can access the bolt hole for one portion of each seatbelt. Now the funny thing is on the female portion of the seatbelts
(the portion that was still in our truck), I was about to spray them black since they were the truck's shade of blue, but
just for the hell of it I tried the new junkyard seatbelt male portion in the seats' female seatbelt latches and they actually
fit, so what did I do? I removed the blue female seatbelt latches and set them aside (nevermind that I actually sprayed
them already when I came to this final decision, but whatever).
Now that we have the seatbelts in place, matching the interior, I took the speaker boards and trimmed them down
so I can fit them back in the original spots they were put in by the previous owners. I drilled a couple of new holes
for each board and secured them in place so now the truck has its sounds back as well as a new black interior.
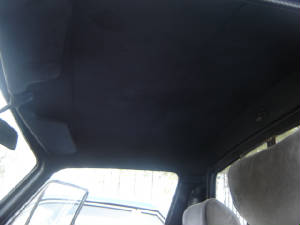
The next thing on the list is the sunvisors. The plastic pieces on each visor that was used to screw them
to the ceiling were both broken, so I had to fabricate a couple of mounting plates from small pieces of thin plate metal,
with the screw hole patterns matched up so when I put the mounting plates onto the visor shafts, I can then remount them up
to the ceiling of the cab. Of course since these visors were blue, they got sprayed black before installation.
The last thing I did was drill a series of holes around the right door panel and secured them with sheet metal
screws, since the panel had a lot of warps and ripples that kept the panel from fitting flush against the door. A once
over with some paint to cover the screw heads blended them in with the panel. The only thing left now
is a new black carpet and the interior will be totally complete.

|
| Newly painted door panel and door |
|
| Headliner and visors painted over |
|
| "Backseat:" area also painted black |
Another thing I did was install another radio in the truck after a simple broken antenna removal resulted
in the fucking up of the old radio that was in the truck. Somehow during the process of removing the heater core box
and a shelf under the glovebox I somehow cut the cable for the antenna. Don't ask how I did that, I still don't even
know how I did it. Anyway, I removed the antenna from the fender then went ahead to pull the other part of the cable
from the back of the radio. I went to pull the cable from the back of the radio, not realizing that the radio had a
short length of cable coming out of the back that terminated at the female end of the antenna cable. Point is, pulling
on the cable at the back of the radio fractured the cable sheath and the shielded conductor in the cable. The only way
I can see repairing that damage is replacing the female connector with another one, soldering it onto the board. The
radio for now, is useless.
There was a light at the end of the tunnel however. Since we were going to be selling the F350, I removed
the CD stereo and radar detector from it since this is about $200 in electronics I would have to get to put in one of the
other vehicles. I took the CD stereo and installed it in place of the fucked up radio. Even though I planned on
using the cassette radio that was in the truck since I can put a tape adapter in the radio and plugging our MP3 player to
it, the CD radio is an MP3 CD radio as well so I can put a data CD with a bunch of MP3's in it and accomplish essentially
the same goal. Besides, the radio adds a bit of a modern twist to this otherwise old and plain truck.
There was an added bonus for the truck that I did as well. I went ahead and did an inverter install.
Part of the reason for doing this was to utilize some hardware that would've otherwise continued to collect dust in the storage
shed. I already have several inverters, none of which are being used. By doing this project, I can add something
to the LUV that would make the truck even more versatile by allowing me to use 110VAC devices while on the road or in the
field.
The first thing I did was take the inverter and secure it to a small piece of plywood using some metal braces,
which was then mounted right behind the driver's seat. Afterward I took a four outlet box that I assembled and mounted
it to a small piece of plywood as well, which was then mounted to the back wall of the cab right over the driveshaft hump.
I then put together a cable with a short length of romex cable and a male three prong plug. This plug plugged into the
power inverter while the other end of the cable went to the outlets. The last thing I did was take a twisted pair of
wire and connected it to the inverter and ran the pair of wires under the carpet on the left side of the driver's seat and
up to the underside of the steering column. I then installed a lighted toggle switch on the left side of the steering
column to the direct right of the glow plug switch. The next thing I did was run a wire directly from the battery with
an inline fuse in place and connected it to one end of the switch while connecting the other end to the positive lead for
the inverter. The last wire from the inverter went to a frame ground. With that, the inverter was installed and
worked like a charm, I throw the switch, it lights up and the inverter came on, just fine.
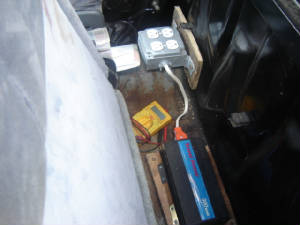
|
| Inverter and outlet box installed behind seats |
There were other little things that had to be done on the truck too, like replacing some suspension components,
plus some minor body/rust patching and some sanding on the front section in preparation for my "Po' Man's Paint Job".
I also installed a radar detector which used to be installed in the F350. The only other thing left right now before
really starting the truck, besides the ignition hookup, is getting a new driveshaft made since we had the original driveshaft
cut up to make one of the driveshafts used in the diesel conversion. Everything is pretty much in place to get this
truck back on the road.
2-7-10:
We did manage to get the truck to start up, once, and run for a period of time, but while it was running,
there were a few things that bothered me. While minor, one was that the oil system wasn't priming itself so oil can
get pulled up to the head to lubricate the valve train. Secondly, the engine ran for maybe a few minutes, wouldn't idle
without stalling, and eventually did stall out after the few minutes run time, failing to start back up again, no matter what.
At this point I started thinking (yeah I know, nothing but trouble comes out of that). The whole point
to doing most of these projects is for the long term self sufficiency or cost effective nature of the projects in the first
place. What does this have to do with the LUV?
Well first of all, the powertrain. The current powertrain is one that while it isn't made anymore
in its current form, this brings us to the crossroads where parts are either hard to find, or pricy, as was the case for the
carburetor. The next issue is the transmission. I have no idea where to find a rebuild kit or pan gasket or much
of anything else for this transmission, since the vast majority of LUV's were manual tranny equipped. This means that
even if we do get this thing running again, eventually stuff is going to start wearing out where we're gonna have to hunt
down some of the parts previously mentioned. With that in mind, what I previously said is going to effectively kill
the cost effective nature that the LUV would've had with its good fuel economy.
But again, what does this mean for the LUV? It means that we started looking at options, again, for
this vehicle. At first as part of a massive cleanup of the yard so we can better focus on other projects, I wanted
to sell the truck so we can get it out of the way. My other half felt otherwise, she felt sorry for the little truck
and didn't want to see it go after all the time we put into it; thats understandable.
So what could we do then? Well the only other choice that would retain the self sufficiency aspect
of the truck while retaining most of its cost effective nature would be to do a conversion of the truck to either a 4.3L V6
or SB V8 with an auto transmission. The main reason behind deciding this is because of the availability of motor mount
brackets that will allow one to mount one of these widely available powertrains into this truck.
I figured that with the small mods to the engine bay after pulling the 4 cyl powertrain, a fully ready V6
or 8 powertrain can be quickly dropped in and hooked up with minimum effort and be ready to go in no time.
This will then bring the LUV into the same territory as the Charger or the Mustangs since it too will have
a powertrain that we will be able to get parts for all day long, either at the junkyards or at auto parts stores.
Now while a V6 or 8 will use fuel, I personally don't believe that it will use much more than the 4 cyl
will. For one, the 4 cyl was noted as being able to get around 25 mpg give or take. Of course this may be slightly
less as on the highway, the little engine will probably be revving more so, especially with the high ratio rear end on the
truck. On the other hand, with a 6 or 8 cyl, either of those engines will produce enough HP and torque to pull the light
truck along effortlessly, and probably achieve anywhere from 20 mpg or more, especially with a vacuum secondary 4 bbl carburetor
on the engine.
Another thing that will allow the vehicle to get a good mpg rating is the addition of an overdrive
auto transmission instead of the typical 3 spd. This combination would definately make the little truck get a high
mileage number while still giving it the balls that it never would've had with the anemic 4 cyl.
With that in mind, we finally decided to abort any further work with the 4 cyl engine, instead looking at
pulling the powertrain out and selling it off, probably piece by piece, to acquire the money to allow us to get what we need
to do this engine upgrade. After pulling the engine and tranny out, we would then start doing those things that are
necessary to prepare the chassis for the acceptance of the larger powertrain, notably some alterations to the firewall, in
addition to the mounting of the brackets for the new engine mounts.
Since we won't be in any hurry to do this, we could do this in our spare time, when we're between tasks
on other projects, all the while still concentrating on other projects.
4-7-10: At this point everything is settled, we now have pretty much everything we need to get this little damned
truck up and running with a powertrain that is common enough to find parts for easily, while still being able to offer a fair
enough amount of power for what it would be intended to do.
Just recently we acquired a 2.8L V6 engine from a fellow off of Craigslist. The engine came from an early 80's
blazer, so its still carbureted, with a first generation electronic distributor, just what we were looking for if you ask
me. We got the engine, along with a shitload of parts, all for $75, the parts alone were probably worth that, being
that we did get an extra carb with it, among other things. The fellow did say the engine would need a new head gasket
(not sure which one), but among the parts is a set of head gaskets, and top end gaskets, so I don't have to buy anything,
I have everything right there to get the engine fixed back up.
We did take a ride to the junkyard to get a few things, one of them being an auto tranny from an 85 blazer, which we
were able to find ONE, in the place. After literally spending two days to do this shit (90 minutes one day, 2 hrs the
next), we managed to get the tranny out. I also decided that we needed to get the other parts to complete the setup
also, which included the Y pipe from the exhaust manifolds, which we got, sans the catalytic converter, which our hacksaw
made easy work of, a thermostat housing, an air cleaner housing, and the fan and pulley for the water pump. We still
need a water pump and alternator and alternator bracket. The water pump will be had new from the auto parts store and
I may just get the alternator and bracket from the junkyard, worst case the alternator can serve as a core for a new one if
it don't work.
At this point we already managed to get everything disconnected from the old powertrain, so all we have to do is hook
the crane up to the engine and hoist the whole thing out. Another thing I even discovered while pulling everything apart
was that the yoke on the driveshaft on the transmission end, actually fits the auto tranny from the 2.8L, so what I plan on
doing is during the fitting of the new powertrain, I want to try and do it where it gets placed in the truck based on the
driveshaft, if all works out well, we will still be able to get the new powertrain installed with minimal fabrication, and
not have to get yet another driveshaft made for this thing.

|
| The 2.8L engine, sitting on a homemade wood stand, awaiting its destiny |
11-25-10:
Its been quite a while since the last update on the LUV and quite a bit has went on since then. For starters, the
powertrain is in the truck, hooked up, homemade motor mounts and all, new driveshaft, exhaust, ad infinitum. Secondly
as we've tested the vehicle out, we are encountering our normal infestations of bugs that we normally have to sort out and
destroy every step of the way.
For starters, during one of our really good road tests, we found out that the tranny leaks like crazy. It appeared
that the thing was leaking from the rear seal, possibly from the oil pan, and the dipstick. Hopefully its not leaking
from the front seal cuz I sure is hell don't feel like pulling a tranny to replace a damned $7 rubber seal. We did replace
the rear seal, pan gasket, and stuffed a bunch of gasket maker around the dipstick before placing it back in the hole on the
tranny body. So far it seems that the leaks have been stopped with the minor exception for what may appear to be a slight
leak from the bell housing which may imply a front seal leak, not severe but something that will eventually need attention.
The other bug that we encountered was that the right front brake caliper kept locking up on us, causing the truck to
drag. This was found out before the heavier road tests, as we couldn't get the truck over 20 mph with the brake locked
up. We first tried replacing the pads, but no luck. We then just went ahead and replaced the caliper (expensive
little bastard at $40) and bled the thing and got the system back in service.
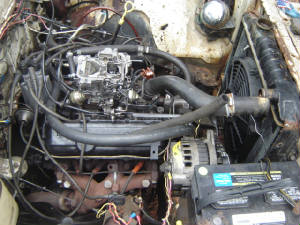
|
| 2.8L V6 installed in LUV engine bay, not too bad of a fit |
The last problem and a major one, was the problem of overheating. The engine would constantly run around 240 degrees,
which was not good, even with the fan running. At least this is what the aftermarket temp gauge said. Nothing
appeared to be super hot or show signs of failing but still, the water was definately boiling in that cooling system.
Since the radiator in the truck is the original 1.8L 4 cyl engine's radiator, its only obvious to assume that the radiator
is too small, along with the cooling fan which is an aftermarket electric fan of about 1' in diameter. A recent trip
to the junkyard netted a radiator from a late model Ford Explorer, which had the hose ends in the right places and was only
a few inches wider on both sides and about the right height. We will obviously have to do some cutting to fit this bigger
radiator in, but then again, how do the V8 guys do it when they shoehorn a smallblock V8 into one of these trucks? Anyway,
we will also have to install some fresh tranny oil lines too, especially since the rubber portions for the old radiator's
lines ruptured, spraying oil everywhere. After installing the radiator we're gonna see if the spacing will be adequate
enough to fit the stock fan back on the engine too.
Other minor setbacks have been the replacement of the distributor cap and rotor, fuel filters, a disassembly of the carb
to clear the needle valve of crud to allow it to close properly (which needs to be done again), and a planned removal of the
fuel tank to clean the inside out of all of the crud that has been causing the fuel system problems that we've been recently
having. With that all taken care of, this truck should be ready to rock and roll pretty soon.
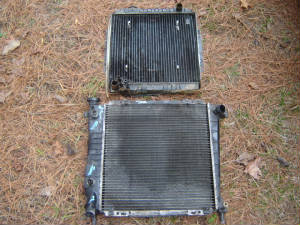
|
| Radiator comparison, older smaller one, to bigger newer one. |
3-14-11: Its definatly been a while since the last entry on the site, especially on this page. A lot has
been going on with all the projects around here so I didn't exactly have the chance to just sit down and write up stuff.
Anyway, as far as the LUV is concerned, I did get the radiator installed, along with a cooling fan. The stock fan on
the water pump wouldn't fit with the larger radiator so I had to break down and put an electric unit in. No biggie,
I hooked a switch to the fan to turn it on and off, at least until I get an auto relay to hook to the thing to turn it on
and off with the ignition key.
The radiator did indeed work at cooling the engine down. It doesn't make it run super cool but it sure to hell
doesn't overheat anymore either. I would say it runs at about the normal temperature that I've always known Chevies
to run at. Other things that we did with the truck was install a new headlight swtich after the first one crapped out,
and installed a new alternator after the old one did the same.
I also ended up having to replace the brake calipers on the front since they were locking up periodically during our
test drives. That wasn't too big of a deal, but the damn calipers were a little pricey.
After letting the truck sit for a while, we decided to stat painting the truck using this method that
we seen online that was titled "The $50 paint job". To sum it up, all it really involved was taking some paint
and thinning it out with thinner and using the small foam rollers to roll the paint onto the body.
We didn't bother to do any crazy masking or removal of panels as I figured I'll just use some paint thinner, razors and soaked
rags to remove the excess paint from the moldings and other areas that weren't supposed to get painted on.
So far we ended up using one whole can of "Sail blue" enamel covering the whole body from head to toe. One of the
things I did notice when using this method of painting was that we got a lot of air bubbles on occasion based on the thickness
of the paint. The thinner the paint was the more air bubbles we had. Of course the used rollers didn't help
with that, but we did manage to work around that by rolling back over the bubbles when the paint had a chance to
dry some.
We got another can of paint to do a second coating; after that we will do a light wet sanding to get rid of
any bubbles and "orange peel" on the surface. If necessary, we'll put a third coating on the body then wet sand and
buff the thing out again. At least the thing does look pretty good from a distance, versus the faded crappy finish
the body had beforehand.
I will have to re route the exhaust pipe though, as the pipe blows sooty crap onto the right top corner of the cab, which
isn't good for our new finish, we'll probably have to go over that area in particular again. There's really not much
left to do before we can start going into the advanced and final stages of this project which is the harder road testing to
verify that this truck is going to be able to handle the long distance drives we periodically take here.
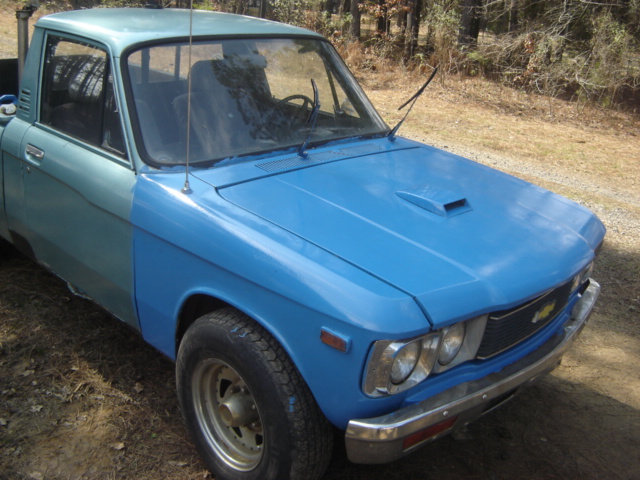
|
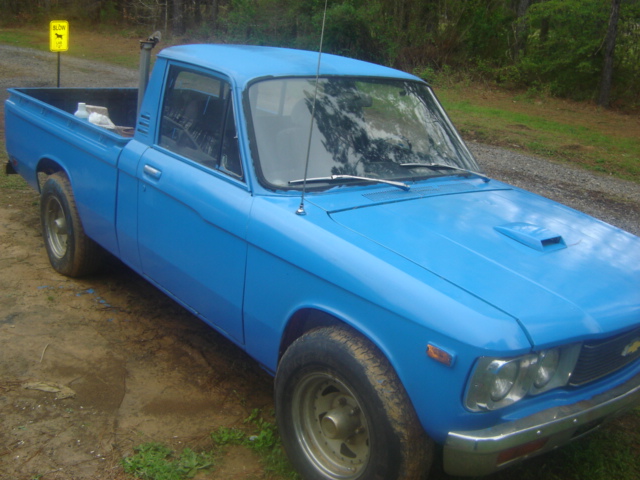
| Shot of truck with front clip painted, compared to the old finish |
|
| Shot of completed body, first coat, bigger improvement |
|


