|
Tearing Everything Apart
Obviously the place where we start in an overhaul/restoration is the tearing down part. We had to take the car
and basically start stripping out everything that was worn out or was going to otherwise be replaced. At this point
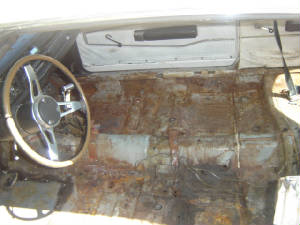
we had already gutted the interior due to a buildup of mold/mildew from sitting in the super humid conditions over two winters
down here in the South. At that point I welded sheet metal into the floor to repair those areas that were rusted through
or otherwise weak, then painted the whole floor in enamel paint to give an extra layer of protection.
As far as everything else, the carpet will be replaced, the dash pad (which is nothing more than a strip of vinyl a few
inches wide that goes on the edge of the dash) will be covered with a patch pad that mimics a new dash pad without actually
replacing the entire dash pad, the headliner will be replaced, along with the side panels and the seats will be reupholstered.
The latter things will obviously be last due to the costs for components and work to accomplish those tasks.
|
| Gutted out interior of car |
Well, after gutting the interior, the car sat for a good while, even after doing the patchup work. Once the tax
refund came through, we had enough money to go ahead and get all the parts to do the engine/transmission overhaul.
Going off on a tangent a bit, the reason that we decided to move ahead with this project is to prepare another car (the
dodge) for use along with the F350 so we can do the work on the Ranger diesel conversion.
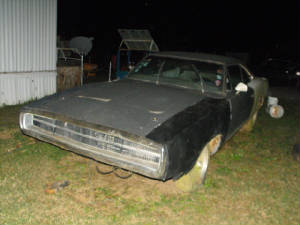
Anyway the first thing we had to do was to move the car from its resting place on the opposite end of the clearing.
This, as we would later find out, was going to F*&*ng SUCK!!! First of all, the whole area around the car on that
side of the clearing was shaded by the pines, and after past rains, had still retained enough moisture to make the ground
still mushy to some degree, at least for any 2 ton cars that are resting on it. To make matters worse, the damned front
disc brake rotors had rusted to the pads enough that the front wheels would not rotate that easily.
I had to turn up the idle on the carburetor after getting the car started due to the idea that the engine would not stay
idling at normal idle RPM on the crappy gasoline that had been sitting in the tank for 6+ months. Even with the running
engine, the front wheels would not break free. After going forward and reverse enough times, we were able to break the
wheels free enough that the car started to move, only to get stuck on the mushy ground later.
At that point, I had to have my partner get in the car and accelerate the engine however I told her to while I pushed
the ass end to walk the car around and get it pointed in the direction I wanted. As I would later find out, that really
sucked too.
Anyway, we got the car pointed about 30 degrees short of the angle we were looking for. At this point I brought
the Ranger in behind the car and while my partner was in the car, I pushed the car with the little Ranger as far as I could
before I got to a point where the Ranger itself would get stuck in the mud.
Next the F350 came into play. I took this broken come-along we had and hooked both ends up between the F350's trailer
hitch and the front end on the dodge. At that point that was what it took to get the car moving. I was able to
pull the car off the mud shit with the truck and get it to harder ground where I could then go ahead and just drive the car
the rest of the way into its next resting place alongside the EV mustang next to the house.
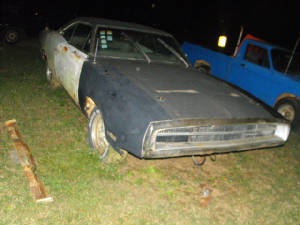
Unfortunately it would not end that easily. Because the front brakes were frozen up on the wheels earlier, that
more or less meant that they were frozen period, as in, NOT WORKING!!! While pulling the car, we were probably going
5 mph give or take, I got to a point where I planned on stopping the truck. I stopped the truck, and immediately looked
in the rear view to find the damned car still rolling at me and BAM! F*&k!!! The car's right side hit the
trailer hitch, breaking the right parking light and chewing up the lower valence around the parking light. Great, just
what I need, more damned body work!! Well, at least it wasnt too bad. I had to toggle through the gears in order
to stop the car since there were no real good brakes. Well, I finally got the car pulled up to where I wanted it to
be to start the real fun.
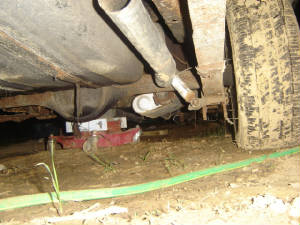
Next I went to pulling everything apart. I pulled the whole front end apart in preparation for the future body
work. Afterward I started pulling everything apart that was hooked up to the engine and transmission - radiator, motor
mounts, electrical, hoses, cables, linkages, everything.
The next thing that I did was get the crane into position and remove the hood so I can hook up the crane. After
getting the crane hooked up, we had to hook the broken come-along again to the rear of the car and hook it up to the truck,
so we can pull the car backwards as the engine/transmission was lifted from the car. That was a bit of a nerve wracking
experience since my partner was in the truck inching forward at my command as I manipulated the heavy weight from the car.
We finally got the engine/trans clear from the car, to which I then lowered it to the ground and disconnected the transmission
from the back of the engine. That was taken off to the side to be rebuilt later. Next I took the engine's oil
pan off then lifted the engine back up only to lower it down onto a couple of saw horses. At that point I removed everything
else on the engine - alternator, PS pump, intake, distributor, etc. I also removed the torque converter and the heads
and put them in the back of the truck to take to their corresponding shops to have the work done to them that following weekend.
After taking those parts in, I then went ahead and started rebuilding the transmission. These things are always
fun. After tearing everything apart, I came to find out that the clutch packs weren't that worn out on the thing.
The only thing that was worn (and not a whole lot) was the front band. I did replace the little sealing rings and gaskets
and rubber crap that was in the kit, but I left the clutch packs alone, they had as much meat on them as the new ones.
Well after replacing everything that I could find on the transmission I went ahead and threw everything back together.
|
| Before.... |
|
| After |
|
|
With the transmission complete, short of a degreasing and repainting and the seals replaced, I moved on to the engine
block. I pulled the connecting rod bearings loose, making sure to keep the caps identified as to which number cylinder
they went to. At that point I pulled the main bearing caps loose, only to find the rear most bearing held in place by
these damned 12 point 3/8" bolts (damn chrysler with their weird combos of parts). I had to stop until I got the 12
point sockets to use to remove that crap. Now at this point I bolted the crane back to the block and hoisted it in the
air so I can pull the crankshaft completely down after removing the final bearings. After I got the crankshaft down, I then
bounced over to the front and pulled the water pump and timing cover off. I then found that the timing chain was pretty
floppy, so I took that off with the intention of replacing the whole set. I pulled the camshaft and lifters out as well.
I can at least resell the camshaft (look on ebay soon for it). The lifters will be heading to our scrap pile soon enough,
with all the other scrap metallic crap we have left over. Last, we pulled the pistons out and matched them to their
corresponding connecting rod caps, then lined them up in order so we'll know which piston goes where later.
At this point I dropped the engine to the ground and tipped it on its back and put the 2 wheel dolly under it to wheel
it over to another spot so I can blast it with engine degreaser then hose it down to get the grime off. I had to use
a wire brush to get some of the crap off, but needless to say, the engine is pretty much cleaned off of grime and crap.

|
| Engine block moved for cleaning |
|
| What the mighty 440 has been relegated to - A pile of crap on the ground |
Well with the engine out, I managed to do all of the normal stuff that needs to be done to the block: cleaning
the block, removing all grime and crud, and just overall getting the block prepared for reinstallation of the internal parts.
I did paint the outside of the block as well.
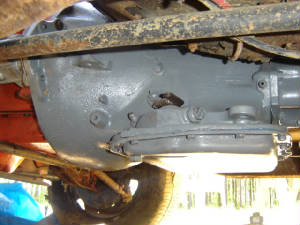
I also tore the transmission apart and went through it as well. I did find out that the clutch discs weren't as
worn out as I anticipated, only one of the bands were bad. Overall, I would have to say that the transmission was in
good shape, I believe the only thing that was really bad was the torque converter, but that was being taken care of by Durabuilt
converters here in MS. They will be rebuilding the TC with a 2500 stall speed as part of the whole rebuild. After
rebuilding the transmission (minus the TC, still in the shop), I went ahead and spray painted the transmission in the same
light grey paint that it originally was in. The transmission turned out to be the least troubling of the rebuild of
the powertrain.
I had the block sitting on a couple of sawhorses while doing the spray painting, and would hook the block up to the crane
to lift it up when I had to do the installation of the crankshaft and the turning of the crank to install the pistons/connecting
rods. After getting the crank and pistons back in, I went on ahead and started putting on the other crap that was hooked
up to the engine - oil pump, crank pulley, water pump, etc.
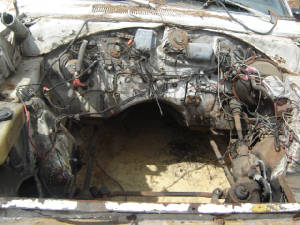
After getting everything back on the engine except the top end (heads, manifolds, distributor), we went on ahead and
reinstalled the transmission to the engine and and got it into position to reinstall into the car. The installation
of the engine/trans had to go in reverse of the way that it came out. After jacking the duo into the air, we slowly
pushed the car under the engine/trans, and cranked and adjusted the crane to slowly work the transmission into the car.
Then, all the while slowly pushing the car under the crane, and lowering the transmission into the car, I adjusted the
crane to start working the engine into the engine bay of the car. Finally, getting the heavy apparatus lowered into
position, I was then able to start the final stage of the installation.
With the engine and trans in position inside the car, I went ahead and installed the transmission mount and crossmember,
the motor mounts, and the driveshaft.
I had to remove the driveshaft from the rear end so I can slide the yoke into the transmission, then hook the rear of
the driveshaft back to the rear end's yoke.
|
| Shortblock engine in car, note painted black engine compartment |
|
| Shot of rebuilt transmission under car, note new paintjob |
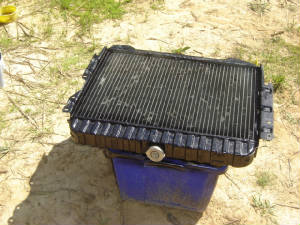
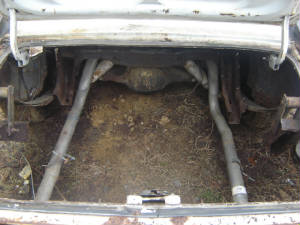
With the engine and transmission in place, I was able to install the radiator and the hoses. The radiator was cleaned
and spray painted to make it look a little more presentable, to say the least. the engine compartment and even the inside
of the hood have undergone painting in gloss black. Of course the engine compartment was painted before reinstallation
of the engine. At this point we also mounted the hood back on, since the engine was solidly mounted and I preferred
to put the hood on to cover the engine rather than using the oversided tarp.
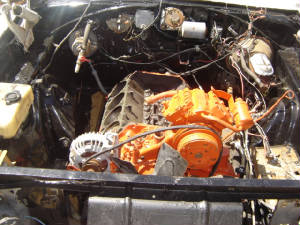
After getting the heads back from Acey's Machine Shop, which by the way have been resurfaced to give the engine a little
boost in compression, I was able to really go into the home stretch on the engine overhaul. I spray painted the heads
orange to match the rest of the engine, then installed the heads. NOW, my biggest concern in this whole damned job -
installing the damned headers!
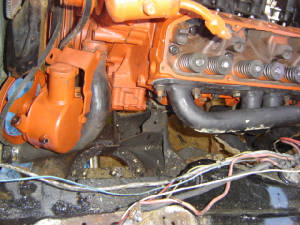
I've had issues installing headers on other cars, but when it comes to Mopars, installing headers SUCKS!!! First
up, for the left header, I had to remove the power steering pump, the starter, and the steering gearbox, then jack the engine
up to make enough room to install the header. Before bolting the header down to the head, I had to install the starter
and the gearbox while I was still able to move the header around in the open space. Once bolting the header to the head,
the starter was totally surrounded by header pipe, and the gearbox didn't fare any better. I installed the PS pump without
any issue, then had to remove the motor mount and bolt it to the frame and lower the engine down onto the mount, since doing
it the other way was fruitless as the mount would never line up with the frame mounting holes.
After wrestling with the left side, the right side, which I thought would be real easy since there is nothing on the
other side to get in the way, turned out to be just as bad. Again I had to jack the engine up off the right mount, which
in turn ripped the left mount apart (dammit), then try to fit the header into position, only to find that the collector would
not clear the gap between the torsion bar and the transmission. The studs on the head also prevented me from getting
the header at just the RIGHT angle to get it bolted into place. The studs were unable to be removed so I had to stick
with them. At this point I had to pull out the hammer and beat the shit out of the collector area and some of the individual
pipes to make the thing narrow enough to allow it to clear the gap between the torsion bar and transmission. I did try
to remove the torsion bar, but without the right tool, along with the rust glue that kept the bar frozen in place, I had to
abandon that idea immediately. But like always the good ole hammer did the trick. I was able to get the header
into place and bolted to the head. Of course I had to do the same thing with the motor mount on the right side that
I did on the left side to get it to fit back in place.
Now that the headers are in place, I have the issue that the headers are rubbing against parts of the inside of the car:
The left header rubs against the steering gearbox, and the right side against the shock tower, so hopefully there won't be
a lot of vibrating when the engine is running. At this point now the next issue will be making sure that the installation
of the exhaust pipes from the headers back will not be too troubling.
|
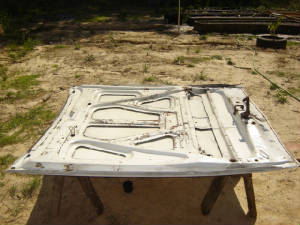
| Hood before.... |
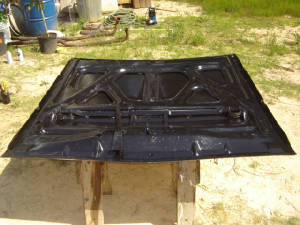
|
| Hood after.... |
|
| Spray painted radiator, heat fins left unpainted for obvious reasons |
|
| Shot of left side showing how I had to remove everything to put the left header in place |
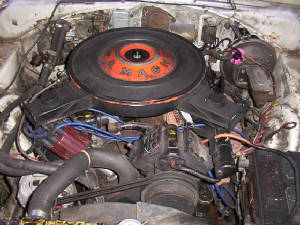
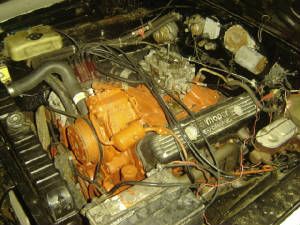
At this point I proceeded with the assembly of the engine, putting the intake on, the valve covers, carburetor and distributor.
I also hooked up the wiring, while at the same time tidying up the wiring with the use of wire ties and electrical tape, along
with the addition of extra wire to lengthen some wires so I can run some of the wires along better routes where they won't
be stretched or otherwise routed over things that can compromise the wiring. With that, I went ahead and installed the
battery (and charged it up), and did a quick TDC hit for cylinder 1 so I can install the spark plugs and wires. After
getting all of that installed, I finally got to a point where I can attempt to crank the motor over.
I hooked up a remote starting switch and commenced to crank the engine. Nothing happened, so I turned the distributor
both ways, still nothing. I already ran out of starting fluid so I had to resort to pouring a little gasoline in the
carb to prime the engine. Still nothing. This time I ended up moving all the wires clockwise one socket to advance
the timing some more. At that point I started getting some sputtering. I moved the wires again, this time the
thing actually fired off and ran until the gas in the carb ran out.
Next, I had to see why the fuel pump wasn't pulling fuel up. This time I took a little electric pump and hooked
it in line with the fuel filter and mechanical fuel pump and fired it up while trying to crank the motor. While the
motor still only sputtered, I at least got the fuel up to the fuel pump and in the line up to the carb. I took the pump
off and hooked everything back up and went ahead and moved the spark plug wires clockwise once again. This time the
engine fired over and actually stayed running. I did some tweaking to the carb to keep it running while I checked the
engine over.
The valve cover gaskets will need to be reinstalled with some gasket maker to seal them up since they seeped oil by them.
This at least let me know the oil pump immediately primed the top end of the engine, so the valve train was getting its oil.
While it was running I looked at the oil pressure gauge and it was in the middle of the scale, acceptable for this car.
Alternator was charging as well. I then noticed that cylinders 5 & 6 were bare after the wires slid off. Damned
spark plug wires. Even then, the engine still ran pretty damned smooth. Anyhow, I shut the engine off to let it
cool since with the headers, that thing got hot under there pretty damn quick.
|
| Assembled engine, ready to run |
Next I brought the two exhaust system sections that I had on hand over to the car to size them up for the cutting up
and fitting to the Dodge. This exhaust system was the one I had made for the 69 mustang that is now the Po' Man's EV.
Since the mustang is shorter than the charger, I will be adding some pipe to each section to extend the length of the system.
Also, since the system was made to fit the mustang and its engine, I found myself having to cut the pipe up it key spots so
I can weld the pipe back up with the angles necessary to fit the system to the dodge body and the headers. It took a
little time eyeballing and setting the pipe up under the car to see what angles I would have to weld the pipe up and even
how the pipe was going to be hung. After a couple hours, I finally got both sides set up. The rear sections consisting
of the axle pipe, muffler and a small section of pipe forward from the mufflers were up, with a hanger in place to hold them
where I wanted them to be. I welded up one of the header flanges to a length of the exhaust pipe from that side of the
system and bolted it up to the right header, while the left header flange was cut from the left half of the exhaust system
since the new pipe will be welded to the flange at a slight angle to fit up to the rest of the left exhaust system.
|
| Section of exhaust pipe cut and bolted to header collector |
|
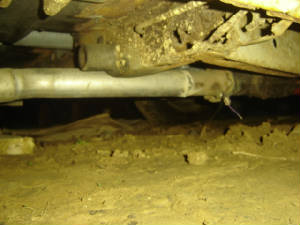
| Rear section of exhaust line with muffler and axle pipe hanging in place |
The good thing about this exhaust system is that the flanges have sockets welded in them for O2 sensors. I had
an O2 meter installed on the mustang so I can monitor the exhaust flow to determine how the engine was running. With
this, I can do the same thing on the dodge. Of course I will have to install the O2 meter in the dodge, but that's no
big deal.
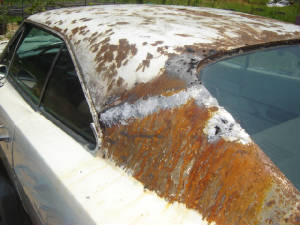
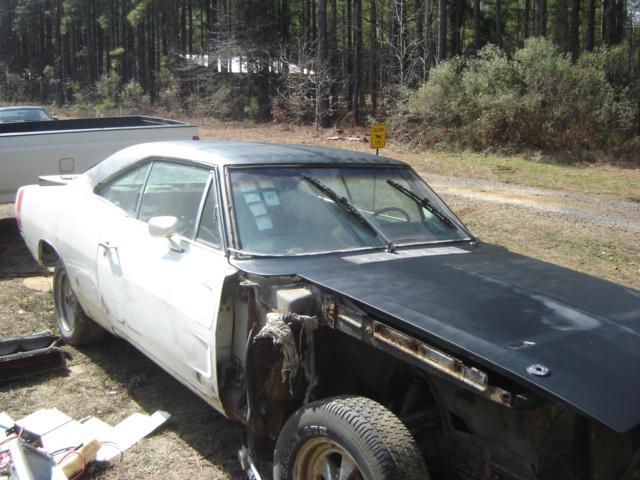
At this point I managed to pull off the old vinyl top, which was nothing but a thin piece of cloth by now, only to expose
the hidden cancer that has plagued this car's roof for quite some time. There were rust bubbles everywhere and surface
rust that when probed with a finger, would give way to a hole in the roof.
I took the die grinder and with a grinding wheel, ground down the rust bubbles and the surface rust that wasn't completely
smooth. There was a spot on the side of the roof where bondo was applied to fill in a deep and wide groove in the metal.
I didn't want to add that much bondo into one area (learned my lesson last time with the first failed attempt at patching
the 69 mustang's body with large amounts of bondo), so I got some lead filler sticks and other misc tools for applying the
lead.
I took my small sandblaster and blasted the area around the groove and fired up the propane torch. I managed to
dump 5 filler sticks into 90% of the groove area, at least lessening the amount of body filler that I would end up appying
in the end.
|
| Rotted roof showing grove where the lead filler has been applied |
After trying to do the lead filler on the left side of the roof, I ended up going back to the bondo, that lead was a
pain in the balls. The stuff wouldn't stick, it kept running down and making a mess everywhere but where I wanted it
to be. Even the stuff that did stick was a pain to grind down with the grinding board. I got the lead down as
best as I could, used up some sanding paper on the electric sander and pulled out the lightweight bondo.
I didnt want to use fiberglass bondo or the barebones cheapo bondo, there was this lightweight stuff that cost more than
the cheapo bondo but was way better than any of the bondos out there. After sanding and grinding down as much rust as
possible all over the roof, I went to town on it with the bondo. I had to go over the roof a couple of times since after
I sanded down the first application, there were pits and missed spots all over. After 2 or 3 sweeps of the roof, I finally
got it all smoothed out with the sander. With that I sprayed black primer over the roof to protect it from the weather
as best as it can until I can fully finish the roof off. This did mean a couple of times having to reapply the spray
primer to catch some rust that was attempting to resurface.
5-8-09: I haven't done a whole lot on the Dodge lately due to the fact that I've been working on a lot of other
stuff around the homestead but one of the things I did manage to do since the opportunity did present itself. The hood
latch on the car was frozen up with no real chance of unfreezing, at least without any real work, and just recently I ran
across an Ebay seller who happened to have one on hand, so I got it from him. Lo and behold, the latch turned out to
also have the release lever with it, so I was able to hook the thing up and actually have a lever that would allow me to unlock
the hood without reaching all the way under the grille like I always had to in the past.
Other small bits of progress I did was the bondo patching of the entire roof along with a light layer of primer paint.
While the roof is not professional by any means, its a hell of a lot better than it was before. There were a couple
of spots where the metal had rusted through to the inside that I put bondo on real thick to try and correct, but due to the
physical characteristics of bondo, those spots cracked up again in short order. I did reapply bondo again, and if necessary
I will probably JB weld some light sheet metal on the ceiling of the roof to provide a backing for a future application of
bondo that will at least hold better. Afterward I will come back with a thicker layer of primer paint and probably even
a layer of flat black paint applied with a roller just to give a good thick covering on the roof. At this point, I would
rather have a semi-shitty paint covering on the roof than to run the risk of the roof rotting anymore than it already had.
More to come....
12-24-10
Its been quite a while since we last worked on the old Dodge and after a while, the high moisture enviroment really took
its toll on the car all around. The following pics show the carnage a lot better than I can describe so I'll just keep
things short.
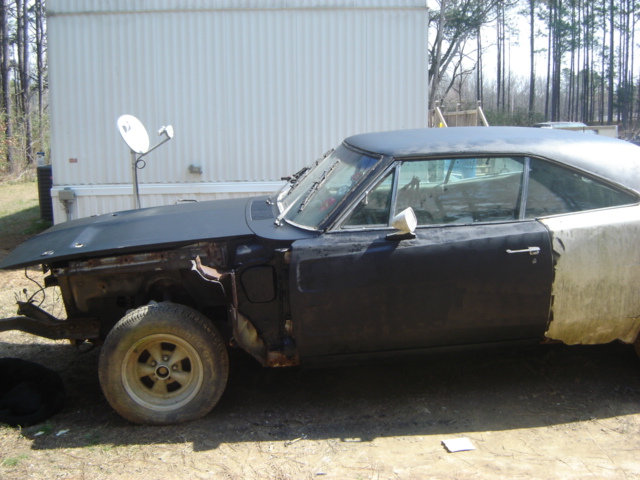
To really sum it up, the front fenders have rotted away to a point that the sides have rotted thinner and thinner until
there's nothing left of the metal. Ideally I would want to just replace the entire fenders, but I will settle for cutting
out the sides and replacing them with fresh skins if that's all we can get.
Next, the rear quarters are shot just as well, with emphasis on the left side. Right above te wheel I was able
to punch through the side where all that was left was rust. The fuel filler area is also rusted all the way around the
fuel cap, so the only real solution is to replace this quarter with one of the complete quarters that goes halfway up the
sail/dorsal fin behind the side window. The right side isn't as bad but is shitty on the sides and on the top, working
its way up the right dorsal fin so we're just going to get pair of complete quarters when our income tax return comes in next
year.
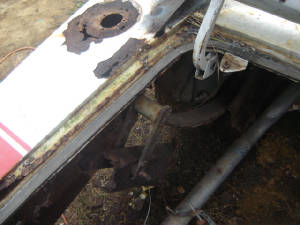
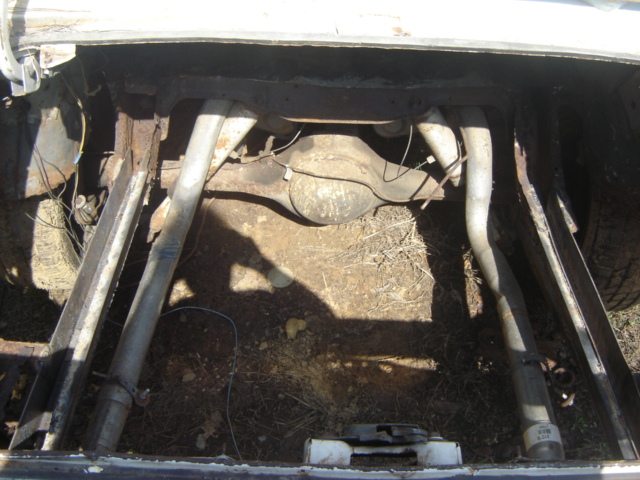
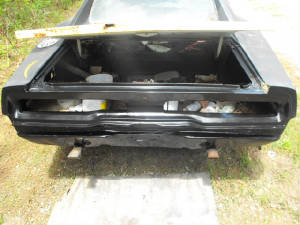
Continuing on, the front valance needs replacing, as well as the taillight panel. Now the worst part is the rear
frame rails. They were completely rotted to damn near nothing, along with the trunk floor. I ended up cutting
out the entire trunk floor, and the frame rails up to about 6 inches from the curve over the axle, meaning just about all
of the horizontal frame rails is now gone. The rear shackles of the leaf springs are now free and poking up near the
top of the trunk. I will have to weld some metal in place to attach the small piece of frame rail that remains that
holds the rear spring shackles on both sides.
On the brighter side, I did manage to get the left rocker panel welded in and painted up with some flat black paint to
protect it from any future rust.
Again the pics will show the dismal condition this car is now in.
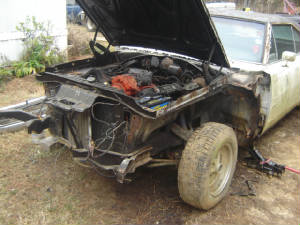
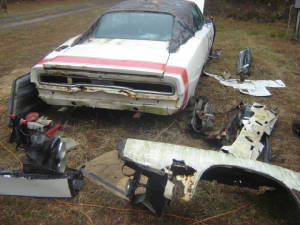
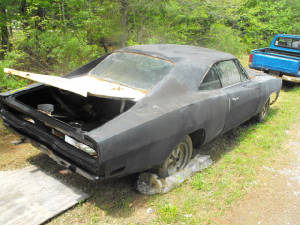
|
| Front end of car with fenders,bumper, and valance removed |
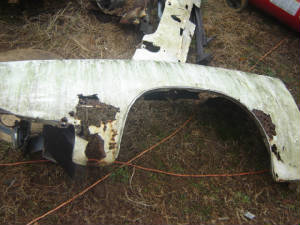
|
| Left fender, with severe rust damage |
|
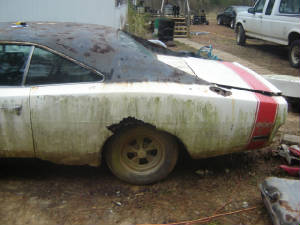
| Rear end of car dragging ass, along with other rusty fender |
|
| Left rear quarter showing rust damage |
|
| Fuel filler hole, rusted to hell |
|
| Trunk area after cutting everything out, see spring shackles on both sides |
2-25-11: At this point I managed to fabricate two frame rails out of some flat stock and angle iron. I did
manage to suffer a setback when our first welder decided to crap out, so after beating it to death when I couldn't get it
working again we just got another unit, a refurbished Campbell-Hausfeld of about the same power as the old unit we had.
With the "new" welder I was able to finish the frame rails, including welding up the leaf spring frame brackets to the
main rails as well. Now the charger's ass isn't dragging on the ground anymore, its riding high and proud once again.
I also started the painting after finding out that the first can of paint was indeed latex paint. I went thru one can
of paint and managed to cover the roof, hood, door, and the inner fender areas. The second can will cover the other
door, right sail plane, more of the inner fender areas and probably second coat some of the already covered areas. The
more we cover the car with the flat black paint, the more this car is actually getting a new attitude, almost like some kind
of sinister mad max hot rod type of car.
|
| Rear frame rails welded in place. |
|
| Painted door, roof, hood. |
|
| Right front shot of car |
3-13-11: Well its been a while since the last entry and much has went on around the homestead. Well since
you're on the Charger page, I will just talk about the Charger related happenings.
As you already know, I managed to get the rear frame rails repaired. The next order of business was getting all
exposed areas painted up with some flat black paint so further rust won't occur. This mainly included the roof, doors,
hood, and any other areas that were not going to undergo further repair.
Since I already bondo patched the roof and part of the sail planes, those were the first areas I painted up. The
hood and driver's door were both in pretty good shape as well so I just sanded them down and painted them as well. It
did turn out that the passenger side door has a couple of shitty areas that upon sanding, exposed the inside of the door,
which means that I'm going to have to put a metal patch on the inside then bondo patch the outside before painting.
After seeing what the complete rear quarter panels cost, I did come to the decision that I will jsut replace the left
quarter completely and just the fender portion of the right side and just continue to patch the right side all the way down
the sail plane. On a lighter note I also painted the inside of the front fender areas to at least help in keeping them
protected further.
Afterward upon close examination of the right rocker panel, which I was going to paint next, I found that it too was
pretty shitty, but since I had the right rocker panel on hand, I just went ahead and hacked it all out and started welding
in the new panel.
10-7-12:
Well its been over a year since the last entry on this project, that's due mainly to working on a bunch of other stuff
at the same time. Well anyway, in that year's time I did manage to do a lot on the Charger just as well.
First of all, I did rebuild, well with the available resources, the trunk floor of the car. I ended up doing a
setup thats similar to the 60's mustangs, where the fuel tank makes up a large part of the trunk floor, meaning that I only
had to put metal down on the sides and in front of the fuel tank. I had plenty of raw stock from some filing cabinets
and water heater skins that I salvaged from different sources. Granted, I will still have to seal the different points
at the edges, like around the fenders and trunk back, either with roofing tar or foam sealant, I'll figure it out. The
main thing is that the trunk floor for all intents is done.
The next order of business is the front fenders. That was a bit of an odyssey for a few reasons. First of
all, in the beginning, I pulled the rusty fenders off with the intent of just scrapping them in exchange for a couple of used
ones in better condition.
Part of the problem with the 70 charger is the idea that NOBODY makes aftermarket fenders for this year of car.
Even though the 68 and 69 chargers look almost identical to the 70, there are big differences between the 70 and the 2 previous
years. The front valance is completely different and larger than the 68/69 cars, meaning the fenders are different.
The front bumper is obviously different, along with the hood, adding to the difference between the fenders.
The interesting thing is, if I truly wanted to, I couldve just did a clone 68/69 car by getting a couple of used 68/69
fenders or even new aftermarket ones and and just re-do the front end to look like a 68 or 69. But, after looking at
how much a complete bumper is for either of those years, along with the front valance in addition to the fenders, that idea
suddenly became prohibitively expensive.
The next idea was going to be to get a couple of used fenders for a cheap price, with the main intent of cutting them
up to look like 70 fenders, doing a little welding to accomodate a 70 front valance. Thing is, the hood and bumper might've
still been a problem however.
At one point I had a couple of leads on used 70 fenders but one was in need of serious restoration and the other one
turned out to be a a phantom item that wasn't really in stock at the junkyard that I called. So without a complete pair
of fenders, even ones that needed work, I ended up scrapping the idea of trying to buy fenders, new or used. I even
had income tax money set aside to make the purchases, but after putting that idea on the shelf, along with the whole plan,
things got delayed for a while. My only hope would've been if I got blessed enough to find a pair of 70 fenders or,
as I will discuss in a minute, actually trying to rebuild the current rusty, jacked up fenders.
Fast forward to the middle of this year, I decided to move the crappy fenders up to the new garage for dry storage so
the elements and the earth cannot further reclaim them. In September, I finally decided to start the project.
With a tub of bondo, sandpaper and other tools in hand, I got to work on the fenders.
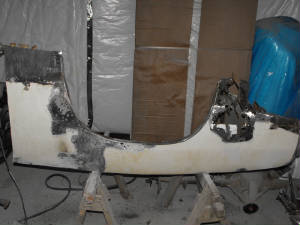
|
| Left fender in its state of decay before restoration |
|
| Closeup of welded patch on fender |
The first thing I had to do was use the die grinder to grind the rust off, get rid of thin spots and bad bondo that was
pulling free and just overall prepare the surfaces, inside and out. The next thing that was done was to cut sections
of sheet metal from more cabinets and water heater skins and weld them to the fender from the inside. This was a tedious
undertaking due to the fact that I had to carefully weld at a low setting and try not to burn thru either the sheet metal
which was pretty thin, or the already weakened sheet metal of the fender.
I was successful at getting the metal backings welded in the various spots on the fender, I then started the long process
of slapping on layers of bondoto fill the cavities created by the openings in the original sheet metal. The backings
I welded in place of course held the bondo in and provided a base for the stuff to hold tight. I had to put layers on,
let it dry, usually overnight, sand it down then put another layer on. I had to do this several times over the course
of a couple of weeks before finally having the surfaces mate up well enough to start on the final steps of blending the bondo
edges with the sheet metal and paint layers prior to putting on a layer of primer paint.
Despite being satisfied with the overall appearance of the work, there are a few flaws that are apparent to the discerning
eye. One is the idea that the hole for the side marker light was well, enlarged due to the rusted away all around, so
there was really nowhere to put the light back in place. In this instance, I will have to get an approximation of where
the side marker housing is supposed to go and cut the opening out in order to install it. The other flaws are the obvious
bondo spots that show through the flat black spray paint (black is typically a hard color to use on a car that has body filler
on it) and this one spot on the top of the fender thats still not perfectly level. I didn't get quite enough filler
in place to perfectly level the surface out so now it looks sorts like the top was slightly dented in or something, nothing
super serious but a flaw nevertheless. Right now I'm not gonna worry about it, as I will still be on the hunt for another
fender thats in better shape to use on the car. I will be trying to get one for as cheap as possible since its not critical
that I replace this fender. So for now I will just focus on the overall appearance of the body.
The other fender was actually a blessing. While I was preparing to restore the original fender, which was WAY more
screwed up than the first one, I ended up stumbling across a fender on ebay for a total of $470 with shipping. While
it was understood that the fender would need a little work, I was pleasantly surprised to find that about all the work it
needed was a good sand down and a little glazing of bondo over a small crack. A few coats of flat black and bolting
down some rubber where the bumper meets the fender along with a bracket and it was ready for bolting to the car.
After bolting the fender to the car and doing a minor trimming in one small spot for it to butt against the rocker panel,
I then bolted the bumper assembly back up. Its still missing some bolts but for all intents its bolted up. Things
are definitely looking up now.
|
| Shot of left fender after restoration |
|
| Right side shot of car |
4-29-14:
It's been a while since the last post on the Charger project, for good reason, I hadn't gotten to it in a while, since
I've been working on a lot of other stuff. The main things that made me work on the car were the acquisition of complete
rear quarter panels after we received our income tax refund money (since the panel pair was over $1000) and the acquisition
of the taillight panel, again after receiving the refund money. The quarter panels were done in the summer of last year
and I just finished installing the taillight panel about a couple of weeks ago.
One thing for those who plan on doing that kind of body work, IT SUCKS! That is the hardest kind of body work one
can ever do, having to cut out the old panels, everything, then prepping the surface in order to weld in the new panels, and
even then, the probability is high that you won't get things lined up quite right. I got it done though, its not perfect
but it looks a hell of a lot better than it did!
I had to use body filler to fill in areas around the seams in order to smooth everything out so the lines can be continuous
and not have these abrupt stopping points where its clear that two panels were butted together. I also hit the surface
with a couple of layers of paint to protect the metal, we don't need that stuff rusting again now.
The taillight housings and bumper are also installed again, had to do some fitting to get everything to fit in right,
also installed the aluminum taillight shroud panel that has the "Charger" name on it. The last big thing was welding
the mount for the trunk latch back in place too and shooting some paint over it to protect it. I still have to order
these two extension pieces that go on the backs of both quarter panels, they shouldn't be too much, but are still necessary
to complete the rear body. The last thing is the trunk lid, even though for all intents I probably need to hunt down
a replacement lid since the old one is rusted through on the underside along the back edge. I will have to just make
do with the patching underneath and cover it in paint to further protect it from any more decay while I hunt down a replacement
panel.
|
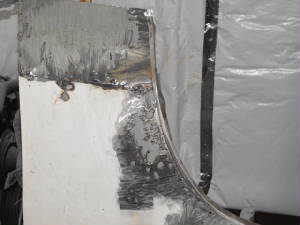
| Installation of quarter panel, note body filler on upper portion of panel |
|
| Shot of rear quarter panel and taillight panel, note lack of seams |
|
| Shot of rear taillight panel/valance |
|


